Paper Orchid Shadow Box – I got to play a little!

13 01 2020

I used to play with paper and make things on an almost daily basis. But then our lives went down a different path and the time and the emotional availability wasn’t there. My creativity flows best when my mind and shoulders aren’t weighed down.

But every now and then, like a snow day :D, I get a chance to play. And that day was yesterday πŸ™‚

I made the 3D Orchid Shadow Box, found here, in the Silhouette Store.

I really like how mine turned out, BUT it is modified from the original, and here’s why: I didn’t read the directions ahead of time. So, a caution to all you paper crafters out there – if there are directions somewhere, take a quick peek before you start, just to make sure ;D

Because I didn’t, my project couldn’t be displayed like the example. But it still works. So, if you want to make this project, too, here’s the blog with the directions lol.

I cut mine out of white card stock and colored the flower parts using copics and colored pencils. I was then able to nest all the boxes, instead of having two separate shadow boxes – this is an example of how mistakes can be springboards for other ideas πŸ™‚

I also added a back, because I could lol.

Thanks for stopping by!

xoxo

img_0385


I Colored…It’s Been a While

14 11 2019

I needed to color and I always need thank you cards so I did this today. Combining the two means I was efficient πŸ˜‰

I found the frog sketch online, but no name with it, so I’m unable to give the credit I’d like to an amazing artist.

I printed it off and colored it using copics and pencils. I put together a digital background and cut the background and the colored frog panel out on my Silhouette then layered them onto a card.

Thanks for stopping by!

Xoxo


Wow. It Worked…

6 05 2018

Lots of times I see things in my head, but I can’t get them out on paper.

The line art for this was on Pinterest (link below). I only WISH I could draw this well.

But I spent a couple of days working on coloring it (it was great stress relief!) and I’m kinda stoked at how it turned out!

Amy Shulke is an amazing artist (but this is not her work) who kindly shares tips and tricks for using copics and colored pencils. You should check her out!

I used my Silhouette workspace to design the piece by digitally adding frames and patterns to help give it a matted look. After doing a print & cut, I wanted a little more substance to it, since it wasn’t going on a card, so I mounted it on a piece of chipboard that I used distress paint on the edge so I kept the look I was going for.

So, yeah. I can’t believe it worked. But I’m so glad it did! Still have much to learn, but I’m better than I was a year ago πŸ™‚


Links: Amy Shulke YouTube page, Line art , pattern paper

Thanks for stopping by!

xoxo


Valentine For the Hubby

15 02 2018

I got his wrapped up about an hour before he got home. I wish I’d had time to make a box or bag for him, but I didn’t.

Here’s what you need to know about the love of my life.

He comes across as intimidating. I have NO idea why, but he does until you take the time to get to know my quiet wonderful man.

Something else you need to know. I think he likes it and kind of plays on it sometimes, especially as our kids have gotten old enough to date.

He also likes to laugh.

So the gifts were made with theses things in mind. And they were well received πŸ™‚

img_4216

thanks for stopping by!

xoxo


Links to files used in the projects

Corset, Pattern1, Pattern 2, I Don’t Like Morning People


Signs That Adoption is Close

9 02 2018

During the last 21 months or so, the baby has been visiting his bio mom twice a week.

In the beginning, there’s always a parent aid involved. When parents make enough progress toward reunification, the parent aid role diminishes until parents finally get unsupervised visits which lead to over nights and even whole weekends with their child.

Our parent aid was involved until the very last visit. This woman, who was a stranger in the beginning, now feels kind of like family. She’s a woman who has been part of my son’s life since the beginning. A woman who made a tough, scary situation for me so much easier. A woman who likes hummingbirds.

So when I decided I wanted to make her a thank you gift for our last visit, I knew I wanted it to have hummingbirds πŸ™‚

Because I still want to vinyl all the things, I knew vinyl would be part of it.

Here’s what I came up with.

I liked the tile, but it’s big and bulky. Also, I wanted to color. So I took the image I put together for the tile and made it work for a card, too. My Silhouette cut out the vinyl for the tile then I tried really hard not to cuss (I was successful) while I tried to get the transfer tape to work for me. It finally did- mostly.

For the card, I printed the images and card design. I then had my Silhouette cut all the pieces out. I love dimension and knew I wanted it in this card. I used my markers and pencils to color bird and flowers then affixed the images on to the card.

Thanks for stopping by!

Xoxo


And She Loved A Little Boy Very, Very Much…

3 02 2018

Tomorrow is our foster son’s last visit with his bio mom.

Last week we had court. A judge sat behind his bench waiting to decide the fate of three families, two sets of parents, and one little boy.

What had been anticipated to be a 1-2 day trial turned into a court session that ran over an hour behind then only lasted 30 minutes.

We lived miracles last week.

The day before court we had mediation with bio mom. She came into the meeting contesting the Termination of Parental Rights (TPR). But after speaking with us and I’m sure many sleepless nights considering her options, in the end, she decided to consent to the termination of her rights and agree to the adoption of her precious little boy.

I’m still unsure how to process that scene. We sat across the table and watched as the court document was signed. I still have trouble wrapping my head around the concept that a SIGNATURE is all it takes to sever those ties. It looks so simple, but was oh so amazingly swift and final.

I hugged her and thanked her. I acknowledged her sacrifice. I’ve learned that love comes in so many ways. She showed an act of love I’m not capable of.

We got word earlier that morning that bio dad’s attorney was asking for a continuance. Someone else hadn’t done their job correctly. So we expected the next morning to bring consent and TPR for bio mom and a continuance for bio dad.

While we waited. I sat with my son’s bio mom. She sat alone on one of the hardest days of her life and I couldn’t ignore that. Maybe I was the last person she wanted to see or talk to. I don’t know. But I asked questions about the children we share. How they got their names. Who they take after. What kinds of things she was going to do with the baby on his last few visits. Our parent aide has agreed to record her playing with the baby and sending me the videos so I can hold on to them for my children.

That hour they ran behind? Bio dad’s guardian ad litem and the court worked some things out and the GAL consented on bio dad’s behalf. I was surprised, too, when bio dad’s sister told me they were happy with how things were working out. She hugged me after court was done. I couldn’t believe we had the support from both sides of the family.

In the end, I couldn’t comprehend – I still can’t – the enormity of her loss. To gain my son, another mother LOST hers. But going through this journey with her for almost two years, the Lord has provided many opportunities for me to understand, to a small degree, the heart crushing cost to one mother so another could raise the child they both loved.

I wanted something special for this last visit. I used his footprints for this card andΒ  included the actual footprints with it so she has those too.

It’s so incredibly inadequate, but it’s all I have.


Not Your Ordinary Christmas Cards

21 12 2017

My husband needed something a little extra special. I looked at what I was working on – files from the Silhouette Design store to make Christmas ornaments.

I made the ornaments.

And cards.

I made the ornaments, as designed and directed, but I did employ some print and cut. I also added a few extra layers to the back of the ornaments for a little more stability.

Then I designed the cards to have the opening cut out to fit the ornament. I also printed off a flat, one layer design that looked like the paper layered design in the ornament. I printed it then cut it out. I didn’t want a blank circle once the recipients removed their ornament. You can kind of see the different stages in this picture.

I affixed the ornament to the card front using some dotto/hermafix temporary adhesive by EK Success. I like this because it holds things in place, but has an easy release and rubs off cleanly.

img_3846

Here are the finished cards.

img_3845


Thanks for stopping by! xoxo

Links to the projects: Comfort and Joy, Holly and Ivy, Seasons Greetings, Winter Wonderland

Adhesive


Christmas Cards Part the Sixth

21 12 2017

Mary at SVG Cuts does such amazing work designing and making so many wonderful and fun things. I LOVE this gingerbread house. I modified it a little because of the paper I was working with. I wanted the brown paper, but it wasn’t as sturdy as I wanted it to be for a box card, so I modified a few things πŸ™‚ I added stickles and used a pearl like pen to finish it off.

I tried not to reuse any of the cards from last year for my husband to take to work, that way there weren’t any duplicates, but I couldn’t resist this one. It’s one of my favorites. It takes a little more time because of all the shading and glitter I added, but it was so worth it in the end πŸ™‚

img_3841

This last one is actually a birthday card for a friend who has a birthday this month, but it can be used as a winter/Christmas card just as easily. This image is actually a sketch file from the Silhouette Design Store, but I printed it instead so I could use my copics to color it in. The ovals and scalloped frames are also from the store, as is the little tagΒ  beneath

Thanks for stopping by!

xoxo

Links to projects: Gingerbread house, Poinsettia card, Pine Cone, Frames


The Barcode Scan Feature Failed Me

2 12 2017

And Silhouette American customer service can’t help me.

Let me show you some things.

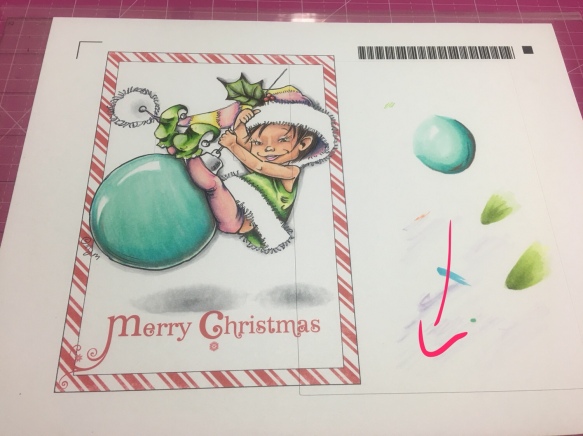
Here’s how the finished card is supposed to look.

Well, something like that. This is my second one and the coloring is a little different. But you guys are smart. You can keep up πŸ™‚

So my card making process on the Cameo for something like this isn’t hard. I added the striped background. I centered a white square on top then added my focal points.

I then printed it off using the barcode option, because I wasn’t going to cut it right away. I was waiting for marker refills, so I designed 3 different cards, printed them all off in this fashion and saved them for later.

When my marker refills came in, I got to work πŸ™‚

Then I put the paper into my machine and hit the barcode icon. And my machine started cutting out a totally different file, ruining 2 days of work.

It’s done this to me once before. I think it was the same wrong file, too. A file that no longer even resides in my library.

I think there was a glitch and the barcode was somehow misinterpreted, either in printing or scanning.

Silhouette customer service says I messed up the registration marks and my image was in the way.

They’re wrong. I printed and cut out the file again, and this time it cut perfectly. And neither of those two issues would make the machine cut out a completely different file.

Let me show you what happened.

That thick black line around the outside of the image is the cut line – the computer tells the machine this is where the paper needs to be cut. The barcode looking thing in the upper right corner is, you guessed it, the barcode πŸ˜‰ The hash marks and the dark black line in the corner, that’s a registration mark (one of them). As you can see, the image is within all the visible borders.

In this picture, you can see a rectangle was cut, but it’s WAY off. And it cut through my image, making it unusable as is. At this point, if that’s all that had happened, it was possible for me to try and come up with something to play it off, like I meant to do this for some cleaver, creative reason. And it’s even *possible* (a little snowflake in Arizona type possible) that bad registration marks or placement could have caused this particular cut.
img_3539

But not these cuts. These cuts aren’t evenΒ part of this project.Β 

img_3540

Nor are they part of any of the two other projects designed in this same workspace. I wish I’d let it finish cutting, so I could see which project it was. But I believe it’s from a different card. One that’s already made and for which the file has already been deleted.

But it seems as though Customer Service ignored these miscuts and sadly, they weren’t helpful.

I feel like this feature is still in beta and no one’s said anything. Or it’s something that didn’t work like they wanted, so they just stopped working on it. I don’t know. But the company really isn’t supporting this feature. It doesn’t yet work how they’ve advertised (they say you can cut without even opening up the file/software. I haven’t seen how, yet). There don’t seem to be any tutorials (at least not easy to find, and not last time I checked) for this feature. And customer service all but ignored the barcode part of my issue, instead blaming my registration marks and placement of the image. Even when I mentioned the barcode, it wasn’t addressed or acknowledged.

Sometimes the barcode scanning works really well. Although, on the three images this project was part of, only one cut successfully. The other had a failed barcode scan, and this one, while the scan appeared to be successful, it cut out the wrong images. But other times, it works. I think the key feature in both times it miscut, was the length of time between printing and cutting. Which is unfortunate, because being able to print now and cut later is kind of what this feature seems to be all about.


Links to project: elf digi stamp, striped background


Christmas Cards Part the Fourth

1 12 2017

Still working on fun πŸ™‚

This card involved digital elements as well as an actual stamp πŸ™‚ The background and the fairy are digital. I printed them off, colored, and then cut them out. Then I stamped the greeting πŸ™‚

This is a stamp I bought a few months ago because, look at it πŸ˜‰ This card is almost completely old school with no digital πŸ™‚ I stamped and colored the image. Cut out all the papers. Used embossing powders and gel pens. When it was time to cut out the stamped portion, I tried to use my pixscan mat, but my machine and that function still don’t get a long. Which is a shame, because it’s such an awesome feature. Instead, I created and cut out two frames. One is the mat. The other I traced around my stamped image then cut the image out by hand. I got the right size by using the pixscan function, even if my machine wasn’t able to cut it out.

And we have a Christmas box card! I think I’ve shifted into the box card making part of my seasonal cards πŸ™‚

Thanks for stopping by!

xoxo

Links to the projects: fairy digi stamp, pattern/digi paper, postcard stamp, snow globe box card