I Made a Thing!

27 07 2018

Holy cow! No posts for like a month+ and now there’s two! And this post is about a 3D project!

If you don’t know – I LOVE 3D paper projects. But they take more time than cards, and I just don’t have a ton of time these days. But for my parents, I stayed up until 3am working on this and I love how it turned out.

We just wrapped up an annual reunion. The tradition is about 30 years old. Each family (there are 10 kids in my mom’s family) takes turns hosting and planning. This year, it was my parents’ turn. It’s a lot of hard work and I wanted something special to thank them with. So I made this and filled it with chocolate 🙂 And yes, they are avid RV-ers, so this was perfect for them 🙂 The file is from SVG Cuts.


Camper 1Camper 2Camper 3


1 Stamp Set 4 Cards

2 04 2018

I haven’t done this for a while, but I really wanted to color then ended up with lots of pieces, so I thought why not?

Here’s part of the process, too. This is part of the coloring process I do. I’ve used my copic markers on the bird and have some shading and variation. You can see the same process in the flower next to the bird, even though it’s not all the way done. Also, I ended up redoing the flowers. Although purples and oranges can be combined for something pleasing, I felt my orange colors were off a little. You should be able to see it when you see the finished card 🙂 You can also see my color combination testing 🙂

img_4441

After finishing the copic coloring, I went in with my prismacolor pencils for more details and subtle shading. You can compare the two birds. I LOVE my copics, but there’s details you just can’t do the same way you can with a finely sharpened pencil point 🙂

img_4452

Once I had everything colored the way I wanted it, I used the coordinating dies to cut the pieces out using my little die cutter then played some more. I needed sentiments.  In my silhouette program I chose some multipurpose words and fun fonts. I used my sketch pens to draw the words then had my machine cut them out. Before removing the words from the cutting mat, I colored them in and added subtle light spots.

So, back to multiple cards. I wanted them to be unified, but not the same. I used four different sizes, but same color schemes and elements.

This one is a 4.25 x 5.5 and I wanted to keep it kind of simple. So flower, leaves, and sentiment. For a little bit of edging interest, I used an embossing folder with my die cutting machine.

img_4613

This one is 8 x 3.5. Same kind of idea as the first, except the edges are simpler, with only a decorative edge on the bottom.

img_4612

Okay. I’m kind of in love with this one. It’s a 5.5 x 5.5 card and I like how the little bird is nestled in the leaves

But this *might* be my favorite out of the bunch. I’m not sure. I flip flop back and forth between this one and the one before. This is a 5×7 card. The edging is a die, but I used it to emboss the paper instead. It’s simple, but not quite with the embossed sections. Now, what you can’t see in any of these pictures is the sparkly spray I dusted them with. I sprayed each piece of paper with glimmer mist before I layered the colored pieces on top. Not only do my cards shimmer now, so do parts of my desk. And I kind of like it.

img_4611

Okay, that’s it for now. Hope your Easter was great and thanks for stopping by!

Some items used:

Bird and flower stamp set

Coordinating Dies


Social Worker Appreciation Month – Have You Thanked One?

7 03 2018

Social work is a hard and often thankless job. The hours are long and the pay is low, but it’s some of the most important work out there. It takes someone special to do this kind of job.

We have been SO BLESSED to have THE SAME caseworker for the baby’s case the ENTIRE time. If you haven’t been in this world, let me tell you, this is HIGHLY unusual. Our case is almost 2 years old and our worker has been a stabilizing part of it. She made a tough, scary situation easier.

To thank her and show her our appreciation, I made a few things.

Here’s everything together. I made the boxes and bags, too, using my WRMK Template Studio 🙂

Up close of the shirt. I found the saying on Pinterest and designed something in Silhouette Studio to fit my needs. I use Siser glitter HTV in mint and now I think I’m in love with the sparkly htv 🙂

I used the same htv on the mug. Also a saying I found on Pinterest that I put into Silhouette Studio and played around with. I even got to use the conical warp tool!

I used my mug press attachment for the first time and I’m kind of in love with that, too! I do wish I’d made it a little smaller, but it’s a live and learn thing I guess 🙂

The mug says: You can’t fix crazy. All you can do is document it.

This card though.

It should have been easier.

I inked the flower stamp in different colors using a stamp positioning tool. But the effect was a little washed out. I did pick lightish colors though. So I grabbed my markers and inked up select areas of the stamp and stamped again.

I still wasn’t happy, so I got out my prismacolor pencils and added details and colors by hand until I was happy. And I LOVED how it turned out BUT I felt like there was too much white space. Hence the bricks.

I used my Cameo’s pixscan feature to cut out a mask for the stamped image. Then I ran some paper and a metal die through my Evolution Advanced die cutter to make a brick stencil. I masked off the flower and inked up the background. But it was a little, eh. So I got out my pencils and enhanced the bricks. Then I felt it competed too much with the flower. That’s the image you see right below.

So I did some fussy cutting (one of my least favorite things to do) to rescue the flower. Then used some other metal dies and an embossing folder to come up with what you see below. I was finally happy with it and called it a night. You can see the finished version below the bricked version 🙂

Thanks for stopping by!

Oh, the flowers on the are mine because my husband’s awesome 😉

Xoxo


Christmas Cards Part the Sixth

21 12 2017

Mary at SVG Cuts does such amazing work designing and making so many wonderful and fun things. I LOVE this gingerbread house. I modified it a little because of the paper I was working with. I wanted the brown paper, but it wasn’t as sturdy as I wanted it to be for a box card, so I modified a few things 🙂 I added stickles and used a pearl like pen to finish it off.

I tried not to reuse any of the cards from last year for my husband to take to work, that way there weren’t any duplicates, but I couldn’t resist this one. It’s one of my favorites. It takes a little more time because of all the shading and glitter I added, but it was so worth it in the end 🙂

img_3841

This last one is actually a birthday card for a friend who has a birthday this month, but it can be used as a winter/Christmas card just as easily. This image is actually a sketch file from the Silhouette Design Store, but I printed it instead so I could use my copics to color it in. The ovals and scalloped frames are also from the store, as is the little tag  beneath

Thanks for stopping by!

xoxo

Links to projects: Gingerbread house, Poinsettia card, Pine Cone, Frames


Christmas Cards the Fifth

21 12 2017

Almost done. Really 🙂

I transitioned to box cards 🙂

The first one I didn’t do too much extra with, but I did shade the red paper on Santa.

The next is from a new kit SVG Cuts released this month. I’m so excited to play with it 🙂 I added in an extra piece (the blue background isn’t part of the file) and did quite a bit of shading on flowers and foliage. This card is super easy, especially if you refrain from the craziness I seem to love 🙂

Links to box cards: Santa, Amaryllis


Because Ovens are Dangerous, I Made an Apple Pie Out of Paper

24 11 2017

Because I have no business baking. I have scars from different baking attempts.

Paper cuts don’t scar, so when I found this cute apple pie box, I went for it 🙂

I had to redo the rose. I wasn’t happy with the first one. This one turned out better 🙂 I used copics and prismacolor pencils on it to give it a bit more dimension. And the lattice work was embossed with an embossing folder 🙂

Thanks for stopping by!

Xoxo

Link to the project here


Because Kindergarten Teachers are Saints

10 11 2017

Really. They are. They deserve more than this box card, but I feel a need to express my gratitude 🙂

I used a few different embossing folders as well as adding slight shadows and such with copics and pencils.

Thanks for stopping by!

Xoxo

Links to items used: box card


Halloween Village Started and a Glaring Mistake and How I fixed it.

13 09 2017

Life is crazy here. If you’ve poked around my blog, you have a good idea why it’s so crazy 🙂 But I try and steal a little bit of free time to work with paper. I have crazy ideas that need to be explored sometimes 😉

During some of those stolen pockets of paper time, I go a little nuts and do something like Maple Manor from SVG Cuts. It’s the beginning of the Halloween Village Square I have in my head. It’s mostly decorated, but I’ll probably go back and embellish it some more after I have more of the village square finished.

Here’s a look at the finished (for now) manor house.

img_3009img_3008

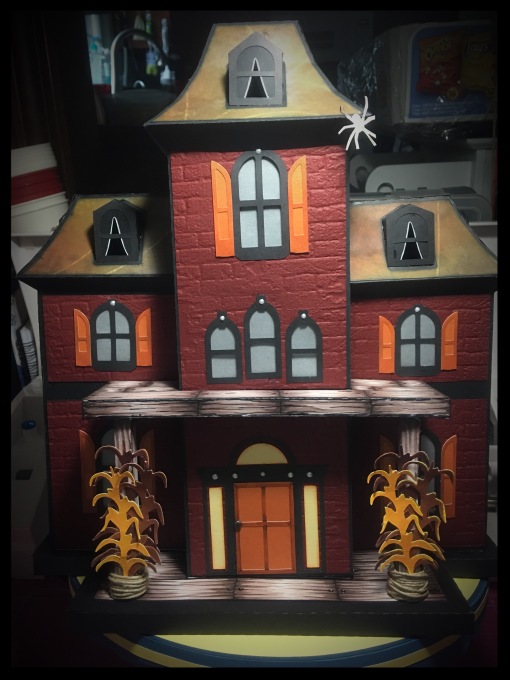
I mentioned there was a glaring error. I’ve disguised it in the above pictures, but let me tell you what I did. See the front door? It doesn’t exactly go right there. It’s close, but not quite right. Mary designed a way cool front porch for this house. When I tried to put it on, I realized my door was too low…I guess I should have watched the tutorial all the way through, but I was too eager to get started 😉

What I ended up with, were porch supports that were too short to fit because I’d made the distance between the bottom of the porch and the top taller than it had been designed when I had to leave out the rest of the porch. Here’s a picture of the fix and disguise I came up with to offset my eagerness.

img_3010

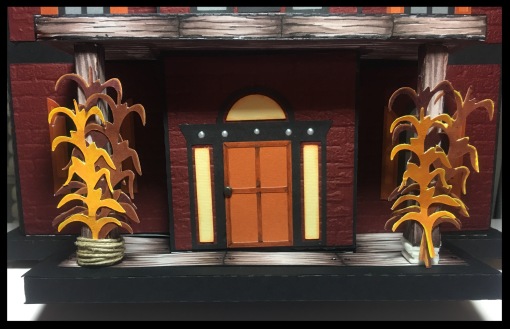
On the right, you can see the foam tape I used to make up the height I was missing. On the left, you can see the disguise. I made the corn stalks from white paper then colored them the colors I wanted. I figured the twine needed a purpose to be there, so corn stalks it was 🙂

Other altered areas:

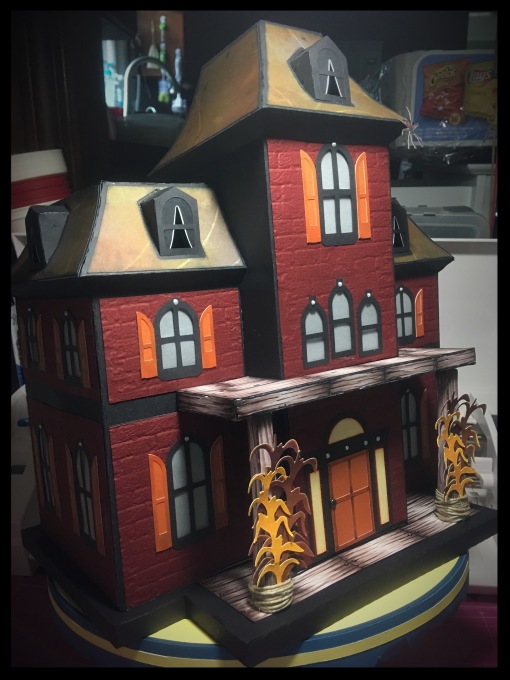
The paper on the roof was the design I wanted, but not the color. It was a little washed out for what I had in mind. So I used my inks and added yellows, oranges, and browns around the edge of the papers to give me the richer fall color I wanted.

Here’s a before and after of the papers.

img_2942

So why mention the mistake in the first place? If you’re just casually looking, you probably wouldn’t notice it.

No matter how good our intentions are, we make mistakes. We’re flawed. It’s what we do. But fixing those things, making something different or even better than what we started with, that’s how we become better.

Many times, what we do after the mistake is more important than the mistake. Do we trash the whole project because of one glaring flaw? Or do we fix it and make something better?

I spent a lot of time on this house. It was worth it to me to work the mistake into something better.

Our lives are so much more important than this paper house. Sometimes we mess up. It’s okay. Even the best people have made mistakes, so we’re in good company. Don’t give up. Once you know where you went wrong, fix it. Make your life better.

If this paper house is worth fixing, so are we.

The spooky pic:

img_3018

Thanks for stopping by!

xoxo

Links to items used:

Maple Manor, Brick embossing folder


Babies Are Great Excuses to Make Awesome Things!

27 08 2017

Like this bag! I used the same papers I used for their baby shower gifts (you can see that, here and here).

The bag was pretty easy to make (there’s a video tutorial on the site) and seems super sturdy.

img_2916img_2918

I added a little extra to the sides by embossing them because I could 😉 Inside was a Royals jumper for the baby and candy for the parents and big sis 🙂

Thanks for stopping by!

xoxo


Flower Power

8 06 2017

You may have noticed a theme. It appears I like flowers 🙂

This was for fun, so I could practice some of the things I learned in the online copic class I took. Even though the class focused on copics, I think the ideas and techniques work well with my prismacolor pencils, too 🙂

The flowers are a combination of copics and pencils. Although I love my copics, pencil worked better for the woman since so many of the spaces were smaller.

I designed it in Craft Artist 2 then imported it into my Silhouette Cameo workspace. I used the print&cut function to cut the pieces out after coloring them.

Thanks for stopping by 🙂

Xoxo

Digital stamps, Embossing Folder