That Time My Father-in-law Turned 90

2 04 2018

Yes, 90! Amazing! His mom lived until she was 102 or 103, so we’ll see what happens πŸ™‚

But when someone turns 90, you gotta have something good because odds are they’ve seen almost everything.

So I put together a gift set for him πŸ™‚

Here he is with his cake – isn’t he handsome? Sorry girls, he’s taken.

Here’s the packaged gift set

img_4622

And unpacked with boxes and bags (I made those, too).

img_4623

And individual pieces

He used to love to garden and liked his flowers. So we went with this card πŸ™‚

img_4626

And a sweet sentiment for him put on a mug – although I’m not entirely happy with how this came out. It was my first time using oracal 651. It just means I need to play more. Yay!

img_4624

And something fun to wear like a big hug from us πŸ™‚

img_4625

Thanks for stopping by!

xoxo

Links to some items used in the gift set:

Springtime Box CardsΒ  Kit, Age is merely


1 Stamp Set 4 Cards

2 04 2018

I haven’t done this for a while, but I really wanted to color then ended up with lots of pieces, so I thought why not?

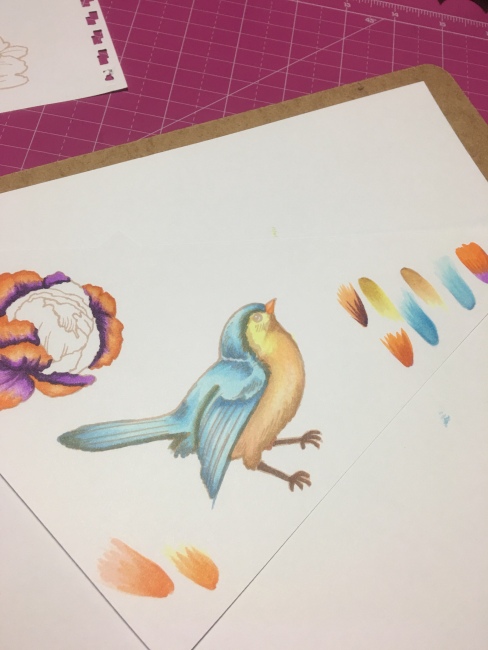
Here’s part of the process, too. This is part of the coloring process I do. I’ve used my copic markers on the bird and have some shading and variation. You can see the same process in the flower next to the bird, even though it’s not all the way done. Also, I ended up redoing the flowers. Although purples and oranges can be combined for something pleasing, I felt my orange colors were off a little. You should be able to see it when you see the finished card πŸ™‚ You can also see my color combination testing πŸ™‚

img_4441

After finishing the copic coloring, I went in with my prismacolor pencils for more details and subtle shading. You can compare the two birds. I LOVE my copics, but there’s details you just can’t do the same way you can with a finely sharpened pencil point πŸ™‚

img_4452

Once I had everything colored the way I wanted it, I used the coordinating dies to cut the pieces out using my little die cutter then played some more. I needed sentiments.Β  In my silhouette program I chose some multipurpose words and fun fonts. I used my sketch pens to draw the words then had my machine cut them out. Before removing the words from the cutting mat, I colored them in and added subtle light spots.

So, back to multiple cards. I wanted them to be unified, but not the same. I used four different sizes, but same color schemes and elements.

This one is a 4.25 x 5.5 and I wanted to keep it kind of simple. So flower, leaves, and sentiment. For a little bit of edging interest, I used an embossing folder with my die cutting machine.

img_4613

This one is 8 x 3.5. Same kind of idea as the first, except the edges are simpler, with only a decorative edge on the bottom.

img_4612

Okay. I’m kind of in love with this one. It’s a 5.5 x 5.5 card and I like how the little bird is nestled in the leaves

But this *might* be my favorite out of the bunch. I’m not sure. I flip flop back and forth between this one and the one before. This is a 5×7 card. The edging is a die, but I used it to emboss the paper instead. It’s simple, but not quite with the embossed sections. Now, what you can’t see in any of these pictures is the sparkly spray I dusted them with. I sprayed each piece of paper with glimmer mist before I layered the colored pieces on top. Not only do my cards shimmer now, so do parts of my desk. And I kind of like it.

img_4611

Okay, that’s it for now. Hope your Easter was great and thanks for stopping by!

Some items used:

Bird and flower stamp set

Coordinating Dies


An Oops and a Sympathy Card

27 08 2017

To be clear, the sympathy card has nothing to do with the “oops” in the title.

We found out about the passing of a woman we used to attend church with. They moved, but people were able to find a current address for them.

This card is for her husband and the rest of the family, but mostly for him. They’d been married for quite some time and I can’t imagine the hole her passing has left in his life.

img_2909

The oops came in when I tried to use the sketch pen in my Cameo to write on the already colored image. Apparently, going over an inked area is not what the pens are made to do – luckily, there are other really great things they do really well. It’s just this specific situation I had trouble with. In case you find yourself in a similar situation, it’s not you. It’s not the pen. It’s the ink already on the paper. Probably. That’s my assumption. It’s the second time I’ve run across this specific set up πŸ˜‰

The sketch pen got enough on the paper that I was able to use a zig pen and fill in the rest. Even though it didn’t work the way I initially imagined, I think I would still do it the same way because I couldn’t do this by hand without the help of my Cameo.

img_2910

Oh, and to do this, I used my pixscan mat – yay pixscan!

The background paper is also from Silhouette. I used the print and cut feature for this. It’s so much easier than going through all the actual paper to find something that would work. Don’t get me wrong. There’s still a huge place for real paper πŸ˜‰

Thanks for stopping by

xoxo

Stamp, Background pattern, Words


My Mom’s Mother’s Day Card

14 05 2017

It’s hard to figure out when to post some things and when not to – so you don’t ruin surprises πŸ™‚ So even though I shared my sister’s mother’s day card, I didn’t post my mom’s early. That, and I had a busy week πŸ™‚

So here’s my mom’s card. Both the sentiment and the butterflies are from the Silhouette Store. The sentiment made me giggle, but then felt a little arrogant, so I followed it up with something on the inside. I used the butterflies as a digital stamp instead of a cut file. I used a sketch pen in my Silhouette Cameo for the words on the card front and inside. The words were colored with prismacolor pencils and the butterflies were a mix of copics and prismacolor pencils.

img_2040img_2041

Thanks for stopping by!

xoxo