The Barcode Scan Feature Failed Me

2 12 2017

And Silhouette American customer service can’t help me.

Let me show you some things.

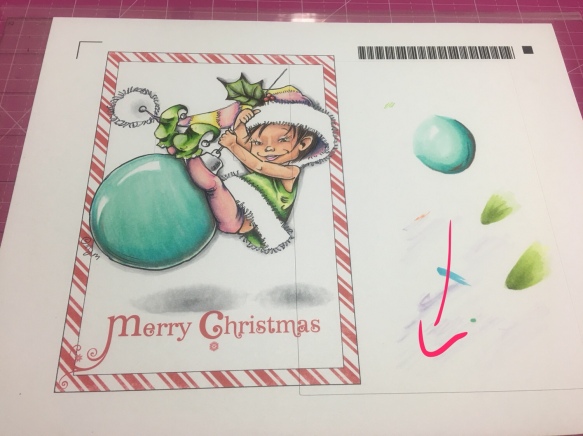
Here’s how the finished card is supposed to look.

Well, something like that. This is my second one and the coloring is a little different. But you guys are smart. You can keep up πŸ™‚

So my card making process on the Cameo for something like this isn’t hard. I added the striped background. I centered a white square on top then added my focal points.

I then printed it off using the barcode option, because I wasn’t going to cut it right away. I was waiting for marker refills, so I designed 3 different cards, printed them all off in this fashion and saved them for later.

When my marker refills came in, I got to work πŸ™‚

Then I put the paper into my machine and hit the barcode icon. And my machine started cutting out a totally different file, ruining 2 days of work.

It’s done this to me once before. I think it was the same wrong file, too. A file that no longer even resides in my library.

I think there was a glitch and the barcode was somehow misinterpreted, either in printing or scanning.

Silhouette customer service says I messed up the registration marks and my image was in the way.

They’re wrong. I printed and cut out the file again, and this time it cut perfectly. And neither of those two issues would make the machine cut out a completely different file.

Let me show you what happened.

That thick black line around the outside of the image is the cut line – the computer tells the machine this is where the paper needs to be cut. The barcode looking thing in the upper right corner is, you guessed it, the barcode πŸ˜‰ The hash marks and the dark black line in the corner, that’s a registration mark (one of them). As you can see, the image is within all the visible borders.

In this picture, you can see a rectangle was cut, but it’s WAY off. And it cut through my image, making it unusable as is. At this point, if that’s all that had happened, it was possible for me to try and come up with something to play it off, like I meant to do this for some cleaver, creative reason. And it’s even *possible* (a little snowflake in Arizona type possible) that bad registration marks or placement could have caused this particular cut.
img_3539

But not these cuts. These cuts aren’t evenΒ part of this project.Β 

img_3540

Nor are they part of any of the two other projects designed in this same workspace. I wish I’d let it finish cutting, so I could see which project it was. But I believe it’s from a different card. One that’s already made and for which the file has already been deleted.

But it seems as though Customer Service ignored these miscuts and sadly, they weren’t helpful.

I feel like this feature is still in beta and no one’s said anything. Or it’s something that didn’t work like they wanted, so they just stopped working on it. I don’t know. But the company really isn’t supporting this feature. It doesn’t yet work how they’ve advertised (they say you can cut without even opening up the file/software. I haven’t seen how, yet). There don’t seem to be any tutorials (at least not easy to find, and not last time I checked) for this feature. And customer service all but ignored the barcode part of my issue, instead blaming my registration marks and placement of the image. Even when I mentioned the barcode, it wasn’t addressed or acknowledged.

Sometimes the barcode scanning works really well. Although, on the three images this project was part of, only one cut successfully. The other had a failed barcode scan, and this one, while the scan appeared to be successful, it cut out the wrong images. But other times, it works. I think the key feature in both times it miscut, was the length of time between printing and cutting. Which is unfortunate, because being able to print now and cut later is kind of what this feature seems to be all about.


Links to project: elf digi stamp, striped background


Crafting and Speech Therapy

2 11 2017

My littlest kiddo is developmentally delayed. One of the delays is speech. The evaluation report used big scary words like “severe” and “profound deficits” in describing his delay.

At about 16 months old, his skill set was equivalent to that of a 3-6 month old.

So we’ve been doing speech therapy. He’s making progress even though it’s kind of slow going, but we have great people with great ideas and experience to back him up πŸ™‚

We’ve introduced signs, and he’s starting to get the hang of things now that he’s realized that communication makes his life better πŸ™‚

In addition to signs, we have pictures. The idea behind these is that he exchanges the pictures of the things he wants for the actual things he wants.

The therapist had a good system that worked for her when she’s working with kids, but it wasn’t as quick and easy as my situation needed. I needed something easy to get to and easily portable.

This is what I came up with πŸ™‚

I have things he knows the signs for, as well as words we’re starting to work on. I’ve also included family members’ pictures so we can add signs for their names, too.

I used my Silhouette program and machine to size and cut the pictures then laminated them. Lastly, I punched a hole in the corners and slid them on a binder ring. This ring is then attached to my belt loop. Easy to carry, always at our fingertips and I can continue to add pictures as necessary.

My hope is eventually, he’ll be speaking verbally. If he can’t, signs are good, too. The pictures are a good starting place for both and a good back up for him.

Thanks for stopping by!

Xoxo


Barcode Scanning Print and Cut Makes My Life Easier!

25 09 2017

So print & cut is a pretty cool feature that allows you to design something in your Silhouette workspace, print it from your computer then take that printed piece and load it into your machine to be cut out.

I recently upgraded my software to the Business Edition, and with the current software version from Silhouette (V4. something or other) there’s this barcode option for print and cut. I searched online a bit, and really couldn’t find out a lot of info about it. I was able to track down what it’s supposed to do, but not really the tutorials that show you how to use the feature. And I didn’t find anywhere that answered questions about it either. They might be out there, I just didn’t find them with a quick internet search. So I spent some of the day playing with it and through some trial and error, figured some things out. I still have some questions, but I’ll post those at the end. Maybe if someone else has the answers they can chime in.

First off, what I was able to figure out is going to save me so much time – which I think is the purpose of adding the barcode and totally worth the upgrade price to me!

So, a basic “tutorial” for the barcode scanning print and cut. I’m using a project I worked on today. The barcode scan came in very handy πŸ™‚

  1. PAGE SET UP: In the page set up window, set your paper size and registration marks. I have a normal size printer, so mine is always set at 8.5×11 for print and cut projects. For registration marks, I use the presets for the Cameo.
  2. ENABLE BARCODE: Down a little further in this window, you’ll notice the option to enable barcode – select that. You can also select whether or not to have this project saved in the cloud for cutting later without opening your software. I haven’t played with that, but couldn’t see how it would work with just the options I had. Maybe if I check that box, there will be other options. But I’ll save that for a different day πŸ˜‰
  3. CREATE: I made a banner for a friend to use at her son’s birthday party. I had lots of pieces to print then cut.Β img_3094I grouped the pieces together the way I planned to print them so I knew how many pages of cardstock I needed to load into the printer.img_3095A closer view of a page. It’s easier to see the barcode, too.img_3096
  4. CUT SETTINGS:Β  it appears that the barcode saves not only the image and placement, but your cut settings. Once printed, I couldn’t find a way to change them. None of the changes I made in the send window affected the cutting after I printed. Unfortunately, I wasted a dozen sheets of paper and time because I didn’t know this, so now I’m telling you πŸ˜‰ There are lots of ways tell the machine how to cut out your images, so use which ever way is most comfortable for you πŸ™‚ I cut by using line color, as you’ll see in the following picture. img_3097Because I was doing a simple print and cut, I only needed the outside of the image to cut. You can see it highlighted here in blue.
  5. PRINTING: send your image to your printer.Β img_3099Now I have all these lovelies to cut.
  6. CUT OUT: Load your page into the machine. To use the barcode scanner to cut out your design, go to the Send window. It doesn’t matter what’s on your screen when you use the barcode feature, so don’t worry about that. At the bottom of the menu, across from the send button, you’ll find the barcode icon. Select this.img_3098
  7. MAGIC: your machine will first scan the barcode, then the registration marks, then it will cut.img_3100

I got asked a couple of questions about this feature today, but I’m by no means an expert. I was askedΒ  how it worked (thus the quick tutorial) and when/why I would use it. So here goes.

If I’m only cutting out images from one piece of paper I printed, the barcode scanning isn’t going to make much of a difference. But often, I find myself printing on more than one piece of paper. To do a print and cut without the barcode, I would print on my paper, grab my paper off the printer (which is not near my desk), load it into my machine and cut it. Then print off the next page and do it all over again if I had multiple sheets of paper.

This doesn’t seem like a lot, but it really wasn’t efficient. And you guys know, I have a bazillion kids. I don’t have a lot of time. What crafting time I do have, I don’t want to spend going back and forth between the printer and my desk. This way is so much more efficient. And a project like today’s is the perfect example of when I would use it. Lots of pages with different images.

My original idea was to print everything, then cut everything. While I had papers piling up, I realized I might be able to begin cutting while I was still printing the rest of the images. It worked!

Overall, I really think I’m going to like this feature. I need to try and figure out how to use the barcode to cut without opening my software – but seriously, it’s ALWAYS open, so this may never actually be an issue.

Thanks for stopping by!

xoxoxo


***REMINDER I’m on V4. something of the software and using Business Edition. I don’t know how this will work on other versions or editions of the software.


Just a Card

14 02 2017

sepia-flower-hello-cardThis was fun to do.

At first, I colored the flower in purple and greens and I just didn’t like it. I printed that piece off again and tried for a sepia look. I’m not sure if I actually pulled off a sepia color with my markers, but I still like how it turned out. I like that it’s all browns except for the hello. The color around the flower was inked on with a sponge.

I did everything on my Silhouette Cameo, from the brown paper in the back to the hello on the bottom. The paper, mat, and flower can all be found in the Silhouette Store.

This is one of the ways I try to save time. If I print everything off, my machine cuts everything out and I don’t waste time looking for the perfect cardstock colors just to find I only have scraps left. Using the print & cut route guarantees I have the right colors.

I don’t know who this card belongs to yet, but I’m sure I’ll find someone πŸ™‚

Thanks for stopping by and have a fantastic day!


Fairy Cottage

3 02 2017

fairy-house-for-posting-2Have I mentioned how much I love 3D?

Here’s another house. I’ve made this one before, but decorated differently because I was doing a winter theme. With this one, I’m trying to urge spring to get here quicker πŸ™‚

This and the Victorian House in the previous post, and another house posted further down are for a silent auction at my kids’ school. It will be interesting to see what the interest in something like this is. This is an SVG Cuts file and you can find all the fun here.

Thanks for stopping by

xoxox