It All Started 15 Years Ago…

11 03 2018

Before I was a mom, I had all sorts of free time and I drew. In art class at school my teacher had me on a different schedule of “Draw whatever you want, ask if you have questions. Next year take AP art.” It worked for me ๐Ÿ™‚

I wanted to keep doing it, but it takes a lot of focus and being in the zone for me. With kids, that just didn’t happen very often.

Then someone introduced me to stamping. I knew about stamping, but just the wooden block ones at the store. I didn’t realize people sold SETS. And that you could do so many different things with them. I was in love.

That was almost 15 years ago and I’ve been paper crafting ever since.

I’ve expanded my knowledge base and exceeded my craft corner space. I’ve added so many different options to my stamping journey, but with the cards on the blog today, I kind of kept it old school – mostly. I did use a couple of dies to cut a few things out.


My father-in-law just turned 90. His birthday party is in a few weeks. This might be his card. Even if it’s not, I channeled him a little as I made it.


I’ve seen these stamps – the girls with no faces – I’m not exactly sure why they don’t have faces – but it was on clearance and I was intrigued! It looked like a lot of fun to color.


I needed a quick birthday card. For the guy my daughter’s dating. It doesn’t really scream guy to me, but I ran out of time. But I like it anyway ๐Ÿ™‚

Thanks for stopping by!

Xoxo


Birthday Six-Pack Box Card

7 03 2018

I LOVE it when my husband asks for a card.

He needed one for his boss the other day and this is what we came up with.

I’ll let you in on the inside joke: we don’t drink. His boss knows that. This is probably the only six-pack his boss will ever see my husband carry ๐Ÿ™‚

Thanks for stopping by!

Xoxo

File used for the card: Sunday With Dad


Only ONE Birthday This Month

10 11 2017

And here’s his card ๐Ÿ™‚

The background mats are created in Silhouette using a pattern from the store and then a solid mat behind that. I used a digital stamp and created the top “layer” of the card. I printed everything off and let my Cameo cut the different card layers out for me. I used my copics and pencils to color the image.

Thanks for stopping by!

Xoxo

Links to items used: pattern, digital stamp


Birthday Card

22 10 2017

This was my girl’s birthday card ๐Ÿ™‚

I used the plain box card file in one of the box card kits in have. I used papers and items from a CA2 kit to decorate it.

I added the papers to the patterns folder and the images I dragged in to the Silhouette workspace and traced.

Obviously, the box card file was altered to fit the project ๐Ÿ™‚

Thanks for stopping by!

Xoxo

Link for box card file: card base


Paris Under the Stars Birthday Party

21 10 2017

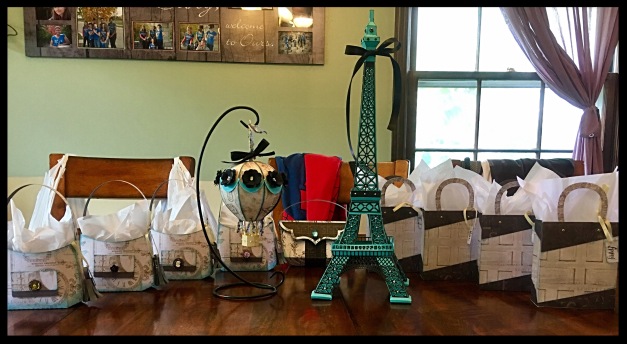
I’ve beenย  working on things for my daughter’s birthday party. It’s finally finished. I’ve shared some of the pieces but not all, and not all together.

Here’s everything together.

img_3229

The tower and Hot Air Balloon together

img_3228

The tower close up

img_3162


The Hot Air Balloon Close Up

img_3227

Bag Close Ups


Links to the projects can be found here: Tower, Hot Air Balloon, Hobo bag and Clutch, Gift Bag


One Last Birthday Card

28 05 2017

A third of our family’s birthdays are in the month of May. We wrapped the birthdays up today with my oldest turning 20.

20!

I’m having a hard time believing that this amazing boy in now 20.

Anyway, here’s his birthday card. It’s from the kit named Sunday With Dad over at http://www.svgcuts.com.

The meat, cheese, tomato, lettuce, and onion were cut out on white paper. I used my copics and prismacolor pencils to color them (obviously, you can cut them out of whatever color you like. I just really like to color).

Thanks for stopping by ๐Ÿ™‚


Keepin’ It Simple Still

24 04 2017

I wanted to focus on coloring, so I’ve tried to buy stamps and things that facilitate this ๐Ÿ™‚ So, the next time I need a birthday card, I’m ready ๐Ÿ™‚

Thanks for stopping by!

Xoxo xoxo

***the stamps are by Sizzex


Digital Stamp with Digital Die

17 02 2017

I have a Silhouette Cameo digital cutting machine. They make it VERY easy to buy things from them. Luckily, they also have a very large selection and variety ๐Ÿ™‚

They’re starting to carry “digital stamps with coordinating digital dies.”

Years ago, when I started stamping, we bought a stamp. We did cool things with it, but if we wanted to cut itย out, we used scissors and sometimes an exacto knife.

Then die cutting machines started becoming popular. But they were big and heavy and expensive. So were the dies. And we had to find somewhere to store all those things. We gave up valuable paper storage space for those suckers. But, we wanted those letters and simple dies cut out, andย idn’t want to spend all of our time cutting them. As die cutting machines shrunk, so did their price, which probably helped boost their popularity. And then, holy cow, someone had the brilliant idea to introduce embossing folders! I love these things. And now we have physical stamps we can buy and store and coordinating dies we can buy to cut the images out for us. Hallelujah! No more scissor hand cramps!

But the digital world was taking off and getting more affordable, too. Years ago I bought something called a Wishblade, by Xyron.ย ย It was one of the precursors to the Silhouette family of digital cutters, but was more than twice the price of today’s machines. I have to say, that machine was pretty cool, but my Cameo is so much better! With these machines we have the ability to create our own shapes. Use an unlimited amount of fonts for whatever we need. We can make 3D things, cards, scrapbook pages, and probably more that I can’t think of right now. We can completely design a card, from bottom to top on the computer, print it out then cut out what we need and assemble it, like I did today.

So it’s not a surprise that digital stamps are now coming with digital dies.

You may be wondering what the big deal is. Can’t you just make your own outline around the image? Yes, you can ๐Ÿ™‚ And I do – a lot. But what I’ve found is neat about these so far (and I haven’t tried many yet) is that the image has already been made user friendly for digital stampers.

Here’s what I mean by that.

Most images made for use with digital cutters are meant to be cut out on paper, so they’re not filled with any color – they’re just lines, they’re completely transparent.

In the card above, if the cute little treat girl had been transparent, one, she would have been a little difficult to cut out because of all the tiny pieces. Two, I would need to somehow fill her in so she wasn’t see through and probably adjust the line weight. Sometimes that’s easy and sometimes that’s not. It depends on the image. Then I could create an outline around her with no problem.

Creating and marketing them as digital stamps means a lot of that work is already done for you, so you don’t have to spend precious crafting time prepping an image to do your bidding ๐Ÿ˜‰ That being said, I think I would like a smaller white border around her. I can totally do that. I already have. That’s what’s so wonderful about working digitally. It’s SO flexible.

The card above was created using a pattern (the background paper) and a digi stamp and die set from the Silhouette store. I printed everything separately, colored it then let my Cameo do what it does best, and cut out those images for me. Easy, peasy, lemon squeezy.

Thanks for stopping by

xoxoxo