I haven’t done this for a while, but I really wanted to color then ended up with lots of pieces, so I thought why not?
Here’s part of the process, too. This is part of the coloring process I do. I’ve used my copic markers on the bird and have some shading and variation. You can see the same process in the flower next to the bird, even though it’s not all the way done. Also, I ended up redoing the flowers. Although purples and oranges can be combined for something pleasing, I felt my orange colors were off a little. You should be able to see it when you see the finished card 🙂 You can also see my color combination testing 🙂
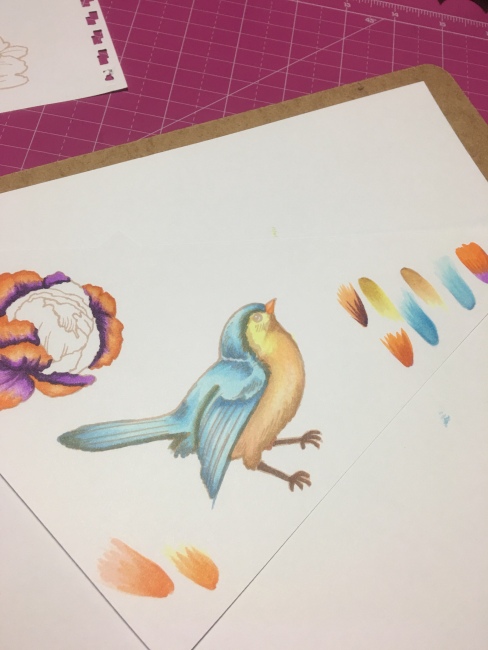
After finishing the copic coloring, I went in with my prismacolor pencils for more details and subtle shading. You can compare the two birds. I LOVE my copics, but there’s details you just can’t do the same way you can with a finely sharpened pencil point 🙂

Once I had everything colored the way I wanted it, I used the coordinating dies to cut the pieces out using my little die cutter then played some more. I needed sentiments. In my silhouette program I chose some multipurpose words and fun fonts. I used my sketch pens to draw the words then had my machine cut them out. Before removing the words from the cutting mat, I colored them in and added subtle light spots.
So, back to multiple cards. I wanted them to be unified, but not the same. I used four different sizes, but same color schemes and elements.
This one is a 4.25 x 5.5 and I wanted to keep it kind of simple. So flower, leaves, and sentiment. For a little bit of edging interest, I used an embossing folder with my die cutting machine.

This one is 8 x 3.5. Same kind of idea as the first, except the edges are simpler, with only a decorative edge on the bottom.

Okay. I’m kind of in love with this one. It’s a 5.5 x 5.5 card and I like how the little bird is nestled in the leaves

But this *might* be my favorite out of the bunch. I’m not sure. I flip flop back and forth between this one and the one before. This is a 5×7 card. The edging is a die, but I used it to emboss the paper instead. It’s simple, but not quite with the embossed sections. Now, what you can’t see in any of these pictures is the sparkly spray I dusted them with. I sprayed each piece of paper with glimmer mist before I layered the colored pieces on top. Not only do my cards shimmer now, so do parts of my desk. And I kind of like it.

Okay, that’s it for now. Hope your Easter was great and thanks for stopping by!
Some items used: