I Had Time to Make Some Cards – and a Mistake!

4 09 2018

I feel like I used all the things to make these 🙂

Most of the designing happened digitally in Craft Artist. Then I added those images to my Silhouette work space and cut them out. THEN I used some stamps and colored those images on the card front. Finally, I assembled them all.

Oh wait, I also used a metal die and my Evolution Advanced for one of the cards. See, I told you. I used all the things 😉

I was in a purple mood, so purple was the theme for these three cards.

First, the one I almost didn’t keep, until I played around with it a little more.

Before:

ed178ea9-f359-4251-b6c7-91cbc26c8f4b

I tried to be tricky and mask the original stamped image so I could add another behind it. But I didn’t like how it turned out. I felt like it was kind of mashed together and it was hard to tell what you were looking at and where each thing was.

Instead of scrapping it, I got out my colored pencils and played a little. If I messed it up, it wasn’t a big deal, I wasn’t planning on using this anyway. All I could see was a winning situation.

Funny thing. I liked the image after I used my pencils. Although I stamped the flowers, I printed off two layers of pretty for my Silhouette to cut out for me.

After:

92a653dd-6e52-4a8e-bc70-f1ddc61e9756

This next one I thought was kind of plain, but it turned out to be the favorite of someone else. So, yay! This card I printed and cut out two layers for the card as well as the bow. I also used my pencils to enhance the bow, because I like crazy details like that. The hello is stamped and I used a metal die to cut it out.

7c5cea24-891f-418b-a37e-b9ed3fcef8fb

This one was kind of fun. I liked the butterfly 🙂 This card just had one printed layer. I also printed and cut out a butterfly so I could pop it on and add dimension. I stamped the orchid and used my pencils to add some shading and a little extra color.

dc13565d-354e-4852-8b72-0f68c649f211

Thanks for stopping by!

xoxo


1 Stamp Set 4 Cards

2 04 2018

I haven’t done this for a while, but I really wanted to color then ended up with lots of pieces, so I thought why not?

Here’s part of the process, too. This is part of the coloring process I do. I’ve used my copic markers on the bird and have some shading and variation. You can see the same process in the flower next to the bird, even though it’s not all the way done. Also, I ended up redoing the flowers. Although purples and oranges can be combined for something pleasing, I felt my orange colors were off a little. You should be able to see it when you see the finished card 🙂 You can also see my color combination testing 🙂

img_4441

After finishing the copic coloring, I went in with my prismacolor pencils for more details and subtle shading. You can compare the two birds. I LOVE my copics, but there’s details you just can’t do the same way you can with a finely sharpened pencil point 🙂

img_4452

Once I had everything colored the way I wanted it, I used the coordinating dies to cut the pieces out using my little die cutter then played some more. I needed sentiments.  In my silhouette program I chose some multipurpose words and fun fonts. I used my sketch pens to draw the words then had my machine cut them out. Before removing the words from the cutting mat, I colored them in and added subtle light spots.

So, back to multiple cards. I wanted them to be unified, but not the same. I used four different sizes, but same color schemes and elements.

This one is a 4.25 x 5.5 and I wanted to keep it kind of simple. So flower, leaves, and sentiment. For a little bit of edging interest, I used an embossing folder with my die cutting machine.

img_4613

This one is 8 x 3.5. Same kind of idea as the first, except the edges are simpler, with only a decorative edge on the bottom.

img_4612

Okay. I’m kind of in love with this one. It’s a 5.5 x 5.5 card and I like how the little bird is nestled in the leaves

But this *might* be my favorite out of the bunch. I’m not sure. I flip flop back and forth between this one and the one before. This is a 5×7 card. The edging is a die, but I used it to emboss the paper instead. It’s simple, but not quite with the embossed sections. Now, what you can’t see in any of these pictures is the sparkly spray I dusted them with. I sprayed each piece of paper with glimmer mist before I layered the colored pieces on top. Not only do my cards shimmer now, so do parts of my desk. And I kind of like it.

img_4611

Okay, that’s it for now. Hope your Easter was great and thanks for stopping by!

Some items used:

Bird and flower stamp set

Coordinating Dies


It All Started 15 Years Ago…

11 03 2018

Before I was a mom, I had all sorts of free time and I drew. In art class at school my teacher had me on a different schedule of “Draw whatever you want, ask if you have questions. Next year take AP art.” It worked for me 🙂

I wanted to keep doing it, but it takes a lot of focus and being in the zone for me. With kids, that just didn’t happen very often.

Then someone introduced me to stamping. I knew about stamping, but just the wooden block ones at the store. I didn’t realize people sold SETS. And that you could do so many different things with them. I was in love.

That was almost 15 years ago and I’ve been paper crafting ever since.

I’ve expanded my knowledge base and exceeded my craft corner space. I’ve added so many different options to my stamping journey, but with the cards on the blog today, I kind of kept it old school – mostly. I did use a couple of dies to cut a few things out.


My father-in-law just turned 90. His birthday party is in a few weeks. This might be his card. Even if it’s not, I channeled him a little as I made it.


I’ve seen these stamps – the girls with no faces – I’m not exactly sure why they don’t have faces – but it was on clearance and I was intrigued! It looked like a lot of fun to color.


I needed a quick birthday card. For the guy my daughter’s dating. It doesn’t really scream guy to me, but I ran out of time. But I like it anyway 🙂

Thanks for stopping by!

Xoxo


Christmas Cards Part the Third – Here’s Another 3

17 11 2017

I’ve been a busy little elf! While I waited for the ink to refill my Copics, I did some designing so I’d be ready 🙂

So, here are the cards 🙂

  1. I used another Stampendous stamp and metal dies to pull this all together. But, I did try something new. This was my first try at no-line coloring. I’m happy with the results of my first try 🙂img_3527

2. The next card features a digital stamp that I LOVE. I used it last year, and I’ll probably use it at least once more this year, in addition to this card. I’m also in love with the saying. The mat is a digital paper I have from an old Craft Artist kit that I imported into the pattern folder in my Silhouette program. I printed the girl separately, colored her, then used the print & cut feature to cut her out and mat her on the front of the card.

img_3530


3. This last card also features a digital stamp. The  backgrounds and mat for this are from the Silhouette Store. It’s all one piece I printed off then cut out. I colored the elf. This one I wasn’t sure about in the beginning. I started this card over at least three times  because I just wasn’t happy. This time, though, it worked. The little elf came out cuter than I hoped she would 🙂 I’m not sure how I pulled that off 😉

img_3519

Thanks for stopping by!

xoxo

Project Links

Card 1: Stampendous stamp

Card 2: One Child saying, Snowflake girl digi stamp

Card 3:  Holiday plaid pattern, snowflake pattern, Elf Mim


If At First You Don’t Succeed…

5 08 2017

Some days I make something and look at the finished project and I’m happy with it. Some days, I’m shocked because it turned out better than I hoped. Those are the times I sit back and say, “I can’t believe that worked.”

This week, there were no days like that. I feel like I struggled for every card I finished – and I only finished three of them. I’m not even posting one of them. I know if I force a project and it’s just not my “thing,” I hit walls like this. But that wasn’t the problem this time. But I also know, that I need to push through those walls. Sometimes pushing through leads to ideas I’d never have thought of, and they worked.

This week, there were no days like that, either.

But I thought I’d share, and even show some of the things that just weren’t working for me.

First up, is the happiness card.

img_2792

I designed the strip along the side in Craft Artist 2 (so sad they’re not around anymore) using a combination of paper layering and then stenciling (all digital). Once I had what I wanted, I exported the pieces and dragged them onto my Silhouette work space. I used a saying that I love, but up until now haven’t figured out a place to use it. I’m still not sure how I feel about using it here, but it’s done 🙂

The challenge here was finding the best way to transfer all those letters onto the card in one piece – I don’t enjoy lining up letters and words just right, it takes too long and I could be doing something fun, like coloring 😉

So the answer I came up with was matting the words. This worked great. I created the mat for the saying using the Offset feature then filled it in with black. It wasn’t quite what I was going for – the letters and words weren’t as connected as I wanted them to be – so I did another offset.

It looked great but cut terribly.

After printing the elements I needed, I loaded my paper into my Cameo. Instead of doing one cut to cut out the exterior mat, it tried to cut out everything. I tried over and over to get it to do what I wanted. Finally, on like the 5th try, a light bulb went off over my head. And in case someone else finds this helpful, I’m going to share that light bulb moment.

When using the offset function, you’re essentially creating another layer. I typically group those layers so I can move them around my workspace easier. Now, remember how I wanted that third mat/layer? I selected my grouped item and used the offset function. What I didn’t realize, was that it was creating a mat for BOTH layers. When I went to cut it, it wasn’t cutting how I thought I’d designed it. THE FIX – ungroup them, “unstack” them, select ONLY the mat that was just created, and offset just the mat. After I had all my pieces done, I layered them, centered them, grouped them, and printed the saying (again), then FINALLY, SUCCESSFULLY cut that thing out how I wanted it.

So here’s the next card.

img_2790

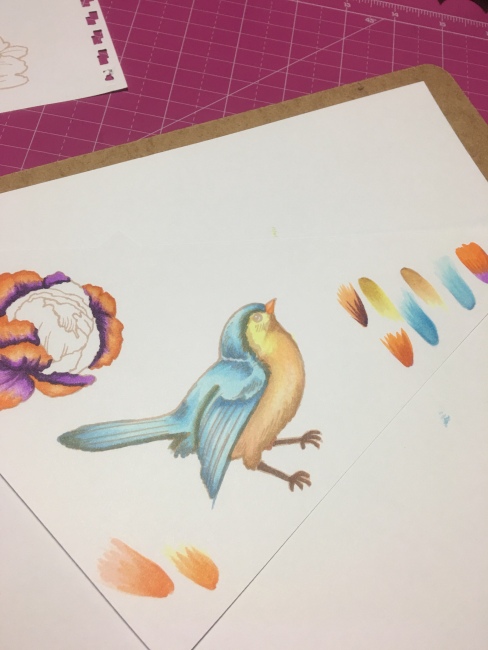
Once again, I designed the background in Craft Artist and got it into my Silhouette work space. I added a sentiment I found in the Silhouette Design store and then added a bird on a branch silhouette (I’m sure you’ve noticed, there is no bird on a branch on this card). I actually tried two or three different bird on a branch silhouettes. The plan was to add the details in and color it – like I’ve done with so many other projects.

It didn’t work.

New idea.

Use one of the stamp and metal die sets to find something that worked – a humming bird fit what I was trying to do. I colored it – and I was happy with how it turned out. Then I lined the image and the metal die up, taped things down and ran it through my die cutting machine. I went to remove it and realized my die slipped at some point and it didn’t cut the image correctly. I stamped and colored again, then lined up everything, added extra tape this time to keep things in place and it FINALLY worked. I put that bad boy together and declared the card done.

Here’s a picture of the card with some of the things that didn’t work. There were more things, but I’d already thrown them away.

img_2791

I hope you had a better week doing whatever it is you do.

Thanks for stopping by!

xoxo

Thank you, Butterfly saying, stamp and die set, bird I didn’t use


Coloring Flowers

25 05 2017

In the online Copic class I’m taking, we just finished talking about coloring flowers. These are what I practiced with. All stamps are from Stampendous and come with coordinating metal dies for easy cutting, except the Thinking of You sentiment. I think that one’s from ArtC.

Thanks for stopping by!

Xoxo