Paper Orchid Shadow Box – I got to play a little!

13 01 2020

I used to play with paper and make things on an almost daily basis. But then our lives went down a different path and the time and the emotional availability wasn’t there. My creativity flows best when my mind and shoulders aren’t weighed down.

But every now and then, like a snow day :D, I get a chance to play. And that day was yesterday πŸ™‚

I made the 3D Orchid Shadow Box, found here, in the Silhouette Store.

I really like how mine turned out, BUT it is modified from the original, and here’s why: I didn’t read the directions ahead of time. So, a caution to all you paper crafters out there – if there are directions somewhere, take a quick peek before you start, just to make sure ;D

Because I didn’t, my project couldn’t be displayed like the example. But it still works. So, if you want to make this project, too, here’s the blog with the directions lol.

I cut mine out of white card stock and colored the flower parts using copics and colored pencils. I was then able to nest all the boxes, instead of having two separate shadow boxes – this is an example of how mistakes can be springboards for other ideas πŸ™‚

I also added a back, because I could lol.

Thanks for stopping by!

xoxo

img_0385


I Colored…It’s Been a While

14 11 2019

I needed to color and I always need thank you cards so I did this today. Combining the two means I was efficient πŸ˜‰

I found the frog sketch online, but no name with it, so I’m unable to give the credit I’d like to an amazing artist.

I printed it off and colored it using copics and pencils. I put together a digital background and cut the background and the colored frog panel out on my Silhouette then layered them onto a card.

Thanks for stopping by!

Xoxo


That Time I Made a Topiary Out of Paper

22 03 2019

As mentioned in a few posts before, the autism center my boys use is amazing. Most of the work on this project was done there. I cut out everything at home, then colored, shaped, and assembled most of it at the center. The topiary is from the kit Thank You For the Music at SVG cuts.

This is kind of picture intensive, so please be patient with me. There were a lot of components.

I took pictures of some of the process. I’m always amazed I can start with flat pieces of paper and make something substantial and dimensional. So I included pics for other people who might feel the same way πŸ™‚

First, the focal points – the flowers. There’s two types. The main flowers and the fillers. Each main flower has 5 parts. I cut them out of blue paper, then added white to the centers, dark blue to the edges, then blended with a shade of blue somewhere between the color of the paper and the dark blue. I believe there were 32 big flowers.

I wanted a fuller topiary, so I used more filler flowers than called for. I used the same process of coloring them as I did for the blue flowers, just different colors.


I also wanted to add clovers and leaves to the base. The clovers are from the Springtime Box Cards kit at SVG Cuts. The leaves are from the pumpkin in the Harvest Sunset Kit, also from SVG Cuts.

I started with white paperΒ  and colored the clovers and leaves the colors I needed them. I used a mix of ink and colored pencils.


And I just HAD to have a hummingbird. And wouldn’t you know it, SVG Cuts has one or those, too! This one is from their Hummingbird Box Card. Instead of cutting out different colors of paper, I cut all the pieces out in white, then colored the individual pieces before assembling. I made a mirror copy that I used to sandwich a wire between so I could make it hover by the topiary.


So those are the elements πŸ™‚ Here’s some pics of the finished product. Thanks to my daughter who helped me get the pics πŸ™‚

The clover.


Craft Project 2

The topiary and the hummingbird.

Craft Project 3

The whole topiary

Craft Project 5

And the card. I used a kit in my Craft Artist collection and designed this card. The flowers weren’t colored, which I LOVE because it allows me to color them πŸ™‚ I used a combination of copics and colored pencils for the flowers on the card.

Craft Project 6


Singing Bird Card and Distress Markers

22 03 2019

I’m probably so behind the times, but I finally found the Tim Holtz distress markers πŸ™‚ I only have one set and will probably try and get the rest πŸ™‚

Craft Project 1

I used the Penny Black stamp called The Sweetest Sound in my stamp positioning tool. I was able to color all the different areasΒ  with the distress markers then go back with water to blend the colors.

After the coloring and blending was finished, I embossed the image with clear embossing powder so I could sponge on the colored back ground. I’m pretty happy with the way it turned out.

I used my Craft Artist program to add the frame πŸ™‚

Someone did a simple act of kindness that had a huge impact on me this week. This card is for them πŸ™‚


Thanks for stopping by!

xoxoxo


Get Well Soon Blossoms

9 08 2018

Life isn’t perfect.

Sometimes you need a get well soon card. But these are SO much better than sympathy cards, so I’m happy to do make them πŸ™‚

I used Penny Black’s The Unfolding stamp for this. There’s masking, inking, platform stamping, watercolor blending, colored pencil work, markers, and just the tiniest bit of sparkle (which you can’t see in this picture but I wish you could).

Thanks for stopping by!

xoxo

Get Well Soon Blossoms


Wow. It Worked…

6 05 2018

Lots of times I see things in my head, but I can’t get them out on paper.

The line art for this was on Pinterest (link below). I only WISH I could draw this well.

But I spent a couple of days working on coloring it (it was great stress relief!) and I’m kinda stoked at how it turned out!

Amy Shulke is an amazing artist (but this is not her work) who kindly shares tips and tricks for using copics and colored pencils. You should check her out!

I used my Silhouette workspace to design the piece by digitally adding frames and patterns to help give it a matted look. After doing a print & cut, I wanted a little more substance to it, since it wasn’t going on a card, so I mounted it on a piece of chipboard that I used distress paint on the edge so I kept the look I was going for.

So, yeah. I can’t believe it worked. But I’m so glad it did! Still have much to learn, but I’m better than I was a year ago πŸ™‚


Links: Amy Shulke YouTube page, Line art , pattern paper

Thanks for stopping by!

xoxo


1 Stamp Set 4 Cards

2 04 2018

I haven’t done this for a while, but I really wanted to color then ended up with lots of pieces, so I thought why not?

Here’s part of the process, too. This is part of the coloring process I do. I’ve used my copic markers on the bird and have some shading and variation. You can see the same process in the flower next to the bird, even though it’s not all the way done. Also, I ended up redoing the flowers. Although purples and oranges can be combined for something pleasing, I felt my orange colors were off a little. You should be able to see it when you see the finished card πŸ™‚ You can also see my color combination testing πŸ™‚

img_4441

After finishing the copic coloring, I went in with my prismacolor pencils for more details and subtle shading. You can compare the two birds. I LOVE my copics, but there’s details you just can’t do the same way you can with a finely sharpened pencil point πŸ™‚

img_4452

Once I had everything colored the way I wanted it, I used the coordinating dies to cut the pieces out using my little die cutter then played some more. I needed sentiments.Β  In my silhouette program I chose some multipurpose words and fun fonts. I used my sketch pens to draw the words then had my machine cut them out. Before removing the words from the cutting mat, I colored them in and added subtle light spots.

So, back to multiple cards. I wanted them to be unified, but not the same. I used four different sizes, but same color schemes and elements.

This one is a 4.25 x 5.5 and I wanted to keep it kind of simple. So flower, leaves, and sentiment. For a little bit of edging interest, I used an embossing folder with my die cutting machine.

img_4613

This one is 8 x 3.5. Same kind of idea as the first, except the edges are simpler, with only a decorative edge on the bottom.

img_4612

Okay. I’m kind of in love with this one. It’s a 5.5 x 5.5 card and I like how the little bird is nestled in the leaves

But this *might* be my favorite out of the bunch. I’m not sure. I flip flop back and forth between this one and the one before. This is a 5×7 card. The edging is a die, but I used it to emboss the paper instead. It’s simple, but not quite with the embossed sections. Now, what you can’t see in any of these pictures is the sparkly spray I dusted them with. I sprayed each piece of paper with glimmer mist before I layered the colored pieces on top. Not only do my cards shimmer now, so do parts of my desk. And I kind of like it.

img_4611

Okay, that’s it for now. Hope your Easter was great and thanks for stopping by!

Some items used:

Bird and flower stamp set

Coordinating Dies


Signs That Adoption is Close

9 02 2018

During the last 21 months or so, the baby has been visiting his bio mom twice a week.

In the beginning, there’s always a parent aid involved. When parents make enough progress toward reunification, the parent aid role diminishes until parents finally get unsupervised visits which lead to over nights and even whole weekends with their child.

Our parent aid was involved until the very last visit. This woman, who was a stranger in the beginning, now feels kind of like family. She’s a woman who has been part of my son’s life since the beginning. A woman who made a tough, scary situation for me so much easier. A woman who likes hummingbirds.

So when I decided I wanted to make her a thank you gift for our last visit, I knew I wanted it to have hummingbirds πŸ™‚

Because I still want to vinyl all the things, I knew vinyl would be part of it.

Here’s what I came up with.

I liked the tile, but it’s big and bulky. Also, I wanted to color. So I took the image I put together for the tile and made it work for a card, too. My Silhouette cut out the vinyl for the tile then I tried really hard not to cuss (I was successful) while I tried to get the transfer tape to work for me. It finally did- mostly.

For the card, I printed the images and card design. I then had my Silhouette cut all the pieces out. I love dimension and knew I wanted it in this card. I used my markers and pencils to color bird and flowers then affixed the images on to the card.

Thanks for stopping by!

Xoxo


The Barcode Scan Feature Failed Me

2 12 2017

And Silhouette American customer service can’t help me.

Let me show you some things.

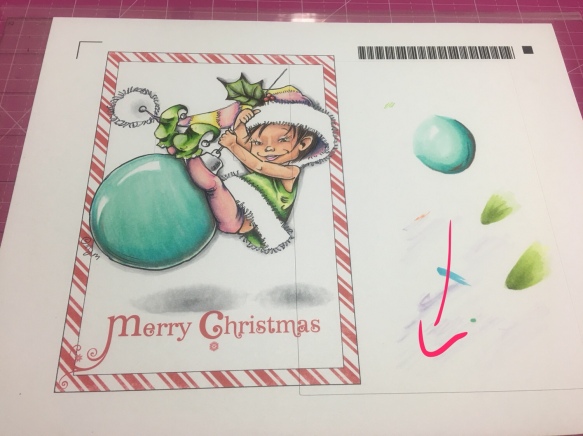
Here’s how the finished card is supposed to look.

Well, something like that. This is my second one and the coloring is a little different. But you guys are smart. You can keep up πŸ™‚

So my card making process on the Cameo for something like this isn’t hard. I added the striped background. I centered a white square on top then added my focal points.

I then printed it off using the barcode option, because I wasn’t going to cut it right away. I was waiting for marker refills, so I designed 3 different cards, printed them all off in this fashion and saved them for later.

When my marker refills came in, I got to work πŸ™‚

Then I put the paper into my machine and hit the barcode icon. And my machine started cutting out a totally different file, ruining 2 days of work.

It’s done this to me once before. I think it was the same wrong file, too. A file that no longer even resides in my library.

I think there was a glitch and the barcode was somehow misinterpreted, either in printing or scanning.

Silhouette customer service says I messed up the registration marks and my image was in the way.

They’re wrong. I printed and cut out the file again, and this time it cut perfectly. And neither of those two issues would make the machine cut out a completely different file.

Let me show you what happened.

That thick black line around the outside of the image is the cut line – the computer tells the machine this is where the paper needs to be cut. The barcode looking thing in the upper right corner is, you guessed it, the barcode πŸ˜‰ The hash marks and the dark black line in the corner, that’s a registration mark (one of them). As you can see, the image is within all the visible borders.

In this picture, you can see a rectangle was cut, but it’s WAY off. And it cut through my image, making it unusable as is. At this point, if that’s all that had happened, it was possible for me to try and come up with something to play it off, like I meant to do this for some cleaver, creative reason. And it’s even *possible* (a little snowflake in Arizona type possible) that bad registration marks or placement could have caused this particular cut.

img_3539

But not these cuts. These cuts aren’t evenΒ part of this project.Β 

img_3540

Nor are they part of any of the two other projects designed in this same workspace. I wish I’d let it finish cutting, so I could see which project it was. But I believe it’s from a different card. One that’s already made and for which the file has already been deleted.

But it seems as though Customer Service ignored these miscuts and sadly, they weren’t helpful.

I feel like this feature is still in beta and no one’s said anything. Or it’s something that didn’t work like they wanted, so they just stopped working on it. I don’t know. But the company really isn’t supporting this feature. It doesn’t yet work how they’ve advertised (they say you can cut without even opening up the file/software. I haven’t seen how, yet). There don’t seem to be any tutorials (at least not easy to find, and not last time I checked) for this feature. And customer service all but ignored the barcode part of my issue, instead blaming my registration marks and placement of the image. Even when I mentioned the barcode, it wasn’t addressed or acknowledged.

Sometimes the barcode scanning works really well. Although, on the three images this project was part of, only one cut successfully. The other had a failed barcode scan, and this one, while the scan appeared to be successful, it cut out the wrong images. But other times, it works. I think the key feature in both times it miscut, was the length of time between printing and cutting. Which is unfortunate, because being able to print now and cut later is kind of what this feature seems to be all about.


Links to project: elf digi stamp, striped background


A Very Not Christmas Card

17 11 2017

Months ago, I started this. Then I realized I didn’t have enough ink in one of my grays. Then it took forever for me to order the small village of ink refills I needed for my stash. Then I colored a few Christmas cards.

Today, today I finished the background πŸ™‚

It’s not exactly how I envisioned it, but I’m not sure I know how to make it look the way I saw in my mind, so this will have to do πŸ™‚

I designed the card in my Silhouette program and did a print & cut.

Thanks for stopping by!

Xoxo

Here’s a link to the image. The artist is kind enough to allow othersto ink the line art πŸ™‚